Requirements
The following program runs under the following conditions:
- Story planes are parallel to the xy-plane.
- The model must not contain any elements spanning several stories (for example, a facade surface spanning two or more floors).
- The foundation and the first floor belong to the zero story.
- Solids are not considered.
- Only planar surfaces are used.
- The z-axis is directed in the direction of the gravitational acceleration ("downwards").
Theoretical Background
Based on the requirements, it's clear that only the story heights must be specified, providing an element, such as a node, with its z-coordinate being above the lower story height and up to a maximum of or equal to the relevant story height.
Therefore, the user has to select a series of nodes that are representative for the story heights. The z-coordinates and thus the story heights can be determined by means of a loop.
In the following, the floors are assigned to all nodes by using the heights.
For lines, it is possible to fall back to the floors of the nodes. If a line starts on a ceiling and ends on the ceiling lying above, it should be assigned to the upper ceiling. The line is therefore assigned to the highest floor that can be found in your nodes.
Since members lie on lines, and since they can be assigned before, the member has the same floor as its line.
The same applies to surfaces. The highest floor of the corresponding nodes is determined.
If all elements of a floor have been assigned, the construction stages can be created from the lists of the floors.
Application
The program uses a template from the Dlubal.RFEMWebServiceLibrary NuGet package as a basis. Here, you can find out how to install it:
First, the active model is connected as follows:
...
#region Application Settings
try
{
    application_information ApplicationInfo;
    try
    {
        // connects to RFEM6 or RSTAB9 application
        application = new ApplicationClient(Binding, Address);

    }
    catch (Exception exception)
    {
        if (application != zero)
        {
            if (application.State != CommunicationState.Faulted)
            {
                application.Close();
            }
            else
            {
                application.Abort();
            }

            application = null;
        }
    }
    finally
    {
        ApplicationInfo = application.get_information();
        Console.WriteLine("Name: {0}, Version:{1}, Type: {2}, language: {3} ", ApplicationInfo.name, ApplicationInfo.version, ApplicationInfo.type, ApplicationInfo.language_name);
    }
    #endregion

    // get active model
    string modelUrl = application.get_active_model();

    // connects to RFEM6/RSTAB9 model
    ModelClient model = new ModelClient(Binding, new EndpointAddress(modelUrl));
...
For better error handling, a try-catch block is used throughout the source code in the main function. Within this block, the application is connected first, which is again done in a try-catch block. After successfully connecting the application, the currently active model (in the foreground of RFEM 6) is connected via the get_active_model method. If any problems occur, the outer try-catch block takes effect.
Since all nodes, lines, members, and surfaces have to be analyzed, it makes sense to get all the elements from RFEM. In order to get the number of the respective elements, the object numbers of all categories are read out first. In the following, the respective objects can then be transferred by means of their numbers:
...
int[] node_nums = model.get_all_object_numbers(object_types.E_OBJECT_TYPE_NODE, 0);
int[] line_nums = model.get_all_object_numbers(object_types.E_OBJECT_TYPE_LINE, 0);
int[] member_nums = model.get_all_object_numbers(object_types.E_OBJECT_TYPE_MEMBER, 0);
int[] surface_nums = model.get_all_object_numbers(object_types.E_OBJECT_TYPE_SURFACE, 0);

//  get all nodes
Console.WriteLine("1. Get all nodes:");
node[] nds = new node[node_nums.Length];
for (int i = 0; i < node_nums.Length; ++i)
{
	nds[i] = model.get_node(node_nums[i]);
	if ((i%10)==0)
		Console.Write("+");

}
Console.WriteLine("");
...
To give the user an overview of the process duration, a "+" is written in the console every 10 elements.
Before transferring other elements, the story heights are determined in the next step. First, you have to read out the selected objects. The transferred array (field/vector including elements) is of the object_location type and contains all selected objects with their type and number. This way, the nodes can be filtered out in a loop. Since all the nodes are already available, it is possible to determine the z-coordinates of these nodes in the same loop. There is a loop going through the selected objects, and as soon as an element is of the node type, a search is run among the nodes for this node, and then its z-coordinate is entered in the floor_heights array. The array is extended by an element for each coordinate found:
...
Console.WriteLine("2. Get selected nodes");
//  get all selected objects
object_location[] obj_locs = model.get_all_selected_objects();

//  get all selected node numbers
double[] floor_heights = new double[1];
foreach (object_location obj in obj_locs)
{
	if (obj.type == object_types.E_OBJECT_TYPE_NODE)
	{
		for (int i = 0; i < nds.Length; ++i)
		{
			if (nds[i].no == obj.no)
			{
				floor_heights[floor_heights.Length - 1] = nds[i].coordinate_3;
				Array.Resize(ref floor_heights, floor_heights.Length + 1);
				break;
			}
		}
	}
}
Array.Resize(ref floor_heights, floor_heights.Length - 1);

//  sort array
//  z-axis is negative, most positive value is ground
Array.Sort(floor_heights);
Array.Reverse(floor_heights);
//  ground and first level are one, remove first entry
double[] tmp_arr = new double[floor_heights.Length - 1];
Array.Copy(floor_heights, 1, tmp_arr, 0, floor_heights.Length - 1);

floor_heights = zero;
floor_heights = tmp_arr;
...
Since the z-coordinates are not in the correct order, the array is first sorted by size. The z-coordinate, however, is in the negative direction, and therefore, the sorting has to be reversed via Reverse. Initially, it was defined that the foundation and the first floor count as one story, that is why the first element in the floor heights is removed.
In a next step, the remaining elements such as lines, members, and surfaces are transferred:
...
//  get all lines
Console.WriteLine("3. Get all lines:");
line[] lns = new line[line_nums.Length];
for (int i = 0; i < line_nums.Length; ++i)
{
	lns[i] = model.get_line(line_nums[i]);
	if ((i % 10) == 0)
		Console.Write("+");
}
Console.WriteLine("");


//  get all members
Console.WriteLine("4. Get all members:");
member[] mems = new member[member_nums.Length];
for (int i = 0; i < member_nums.Length; ++i)
{
	mems[i] = model.get_member(member_nums[i]);
	if ((i % 10) == 0)
		Console.Write("+");
}
Console.WriteLine("");

//  get all surfaces
Console.WriteLine("5. Get all surfaces:");
surface[] srfs = new surface[surface_nums.Length];
for (int i = 0; i < surface_nums.Length; ++i)
{
	srfs[i] = model.get_surface(surface_nums[i]);
	if ((i % 10) == 0)
		Console.Write("+");
}
Console.WriteLine("");
...
To sort the elements into the individual stories, two-dimensional lists are created first. The nds_floor_numbers list has the stories as a first dimension and the node numbers of the story as the second dimension. First of all, the following loop goes over all nodes and has a sub-loop, which goes over all story heights. In this way, it is checked for each node from the bottom in the building to the top whether the Z-coordinate lies within the story height. Due to numerical inaccuracies, a tolerance of 1 mm was subtracted:
...
//  loop through nodes and set their floor
Console.WriteLine("6. Loop through nodes and get their floor");
for (int i = 0; i < nds.Length; ++i)
{
	for (int j = 0; j < floor_heights.Length; ++j)
	{
		if (nds[i].coordinate_3 >= floor_heights[j] - 0.001)
		{
			nds[i].comment = j.ToString();
			//Console.WriteLine("node " + nds[i] + " floor " + j + ";" + nds[i].coordinate_3 + ";" + (floor_heights[j] - 0.001));
			nds_floor_numbers[j].Add(nds[i].no);
			//model.set_node(nds[i]);
			break;
		}
	}
}
...
As soon as a node lies within the specified region, the number of the story is entered as a comment to it, and the node number is added to the list. At this point, it would be possible to also transfer the comment to RFEM (commented out). The reason why the comment is used is because in the following it is not the z-coordinates that are to be evaluated, but the story number. This is evident when looking at the loop over the lines:
...
//  loop through lines, get their nodes and set their floor
Console.WriteLine("7. Loop through lines and get their floor");
for (int i = 0; i < lns.Length; ++i)
{
	//  get nodes of line
	int[] ln_node_nums = lns[i].definition_nodes;
	Int32 floor_max = 0;
	//  loop through nodes of line
	for (int j = 0; j SMALLERTHAN ln_node_nums.Length; ++j)
	{
		//  loop through nodes
		for (int l = 0; l SMALLERTHAN nds.Length; ++l)
		{
			if (nds[l].no == ln_node_nums[j])
			{
				Int32 floor = Int32.Parse(nds[l].comment);
				if (floor > floor_max)
				{
					floor_max = floor;
					break;
				}
			}
		}

	}
	//  enter maxiumum floor in line
	lns[i].comment = floor_max.ToString();
	lns_floor_numbers[floor_max].Add(lns[i].no);
	//model.set_line(lns[i]);

}
...
The loop goes through all lines and has a sub-loop, which goes through all nodes of the line. Within this sub-loop, there is another loop running through all nodes to find the node matching the node number from the line. Out of this node, the story number from the comment is read. As already mentioned in the theoretical basics, it is sufficient to determine the highest story number. This number is then stored as the story number in the comment of the line, and the number of the line is inserted in the list.
The members get the same story numbers as the lines on which they lie. Thus, a loop over all members with a sub-loop over all lines is required. As soon as the line number matches the number of the member, the member gets its story height as a comment and the number is added to the list:
...
//  loop through members, get their line and set their floor
Console.WriteLine("8. Loop through members and get their floor");
for (int i = 0; i < mems.Length; ++i)
{
	//  get line number of member
	int mem_ln_num = mems[i].line;

	//  loop through lines
	for (int j = 0; j < lns.Length; ++j)
	{
		if (lns[j].no == mem_ln_num)
		{
			mems[i].comment = lns[j].comment;
			mems_floor_numbers[Int32.Parse(lns[j].comment)].Add(mems[i].no);
			break;
		}
	}

}
//  loop through surfaces, get their lines and set their floor
Console.WriteLine("9. Loop through surfaces and get their floor");
for (int i = 0; i < srfs.Length; ++i)
{
	//  get lines of surface
	int[] srf_line_nums = srfs[i].boundary_lines;
	Int32 floor_max = 0;
	//  loop through lines of surface
	for (int j = 0; j < srf_line_nums.Length; ++j)
	{
		//  loop through lines
		for (int l = 0; l SMALLERTHAN lns.Length; ++l)
		{
			if (lns[l].no == srf_line_nums[j])
			{
				Int32 floor = Int32.Parse(lns[l].comment);
				if (floor > floor_max)
				{
					floor_max = floor;
					break;
				}
			}
		}

	}
	//  enter maxiumum floor in surface
	srfs[i].comment = floor_max.ToString();
	srfs_floor_numbers[floor_max].Add(srfs[i].no);

	//model.set_surface(srfs[i]);

}
...
The procedure in surfaces is similar to that in lines. There is a loop over the surfaces with the sub-loop over their boundary lines. The highest floor from the boundary line becomes the story number of the surface.
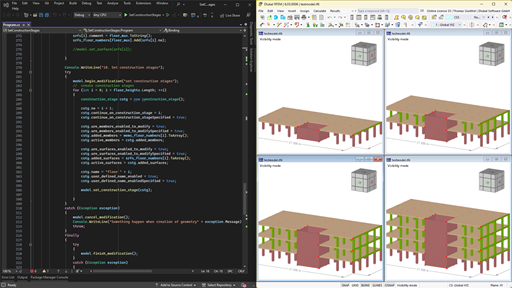
After sorting all the elements into the stories, the construction stages must be created. A construction stage is created for each story, so a loop is done over the story heights:
...
Console.WriteLine("10. Set construction stages");
try
{
	model.begin_modification("set construction stages");
	//  create construction stages
	for (int i = 0; i < floor_heights.Length; ++i)
	{
		construction_stage cstg = new construction_stage();

		cstg.no = i + 1;
		cstg.continue_on_construction_stage = i;
		cstg.continue_on_construction_stageSpecified = true;

		cstg.are_members_enabled_to_modify = true;
		cstg.are_members_enabled_to_modifySpecified = true;
		cstg.added_members = mems_floor_numbers[i].ToArray();
		cstg.active_members = cstg.added_members;

		cstg.are_surfaces_enabled_to_modify = true;
		cstg.are_surfaces_enabled_to_modifySpecified = true;
		cstg.added_surfaces = srfs_floor_numbers[i].ToArray();
		cstg.active_surfaces = cstg.added_surfaces;

		cstg.name = "floor " + i;
		cstg.user_defined_name_enabled = true;
		cstg.user_defined_name_enabledSpecified = true;

		model.set_construction_stage(cstg);

	}
}
catch (Exception exception)
{
	model.cancel_modification();
	Console.WriteLine("Something happen when creation of geometry" + exception.Message);
	throw;
}
finally
{
	try
	{
		model.finish_modification();
	}
	catch (Exception exception)
	{
		Console.WriteLine("Something happen when finishing creation of geometry" + exception.Message);
		throw;
	}
}
...
For creating elements in RFEM, a begin_modification/finish_modification block is additionally used in order to maximize the transfer speed. If problems arise, an additional try-catch block provides protection, which calls cancel_modification in the event of a break-off, thus terminating the processing properly. An important note about the transfer is that the elements to be transferred such as continue_on_construction_stage can only be transferred if the corresponding "Specified" property has been set to "true" (continue_on_construction_stageSpecified). Not all elements have such a "Specified" property, but where it is available, it must be taken into account.
Summary
Due to the versatility of the WebService & API interface, it is possible to automate a number of entries which would be time-consuming when manually done. In the present example, input for the Construction Stages Analysis add-on is automated, which also serves as a placeholder for many other add-ons and options. Thus, there are only a few limits to your creativity for time-saving solutions, and more examples will follow.


.png?mw=600&hash=49b6a289915d28aa461360f7308b092631b1446e)