Программа для расчёта конструкций RFEM 6 является основой нашей модульной системы программного обеспечения. Основная программа RFEM 6 используется для задания конструкций, материалов и нагрузок плоских и пространственных конструктивных систем, состоящих из плит, стен, оболочек и стержней. Программа также позволяет создавать комбинированные конструкции, а также моделировать тела и контактные элементы.
RSTAB 9 - это мощная программа для расчёта и проектирования 3D конструкций балок, каркасов или ферм, которая которая помогает инженерам-строителям соответствовать современным требованиям и отражает последние тенденции в области строительного проектирования.
Вы часто тратите слишком много времени на расчёт сечений? Программное обеспечение Dlubal и автономная программа RSECTION облегчают вашу работу, определяя характеристики и выполняя расчёт напряжений для различных сечений.
Вы всегда знаете, откуда дует ветер? Конечно, со стороны инноваций! RWIND 2 - это программа, которая использует цифровую аэродинамическую трубу для численного моделирования потоков ветра. Программа моделирует эти потоки вокруг зданий любой геометрической формы и определяет ветровые нагрузки на поверхности.
Вам нужен обзор зон снеговой, ветровой и сейсмической нагрузок? Тогда вы находитесь по адресу. Используйте инструмент Geo-Zone Tool для быстрого и лёгкого определения снеговых нагрузок, скоростей ветра и данных по сейсмике в соответствии с ASCE 7‑16 и другими нормативами различных стран.
Хотите попробовать в работе функции программ Dlubal Software? У вас есть такая возможность! Бесплатная полная версия на 90 дней позволяет вам в полной мере попробовать в работе все наши программы.
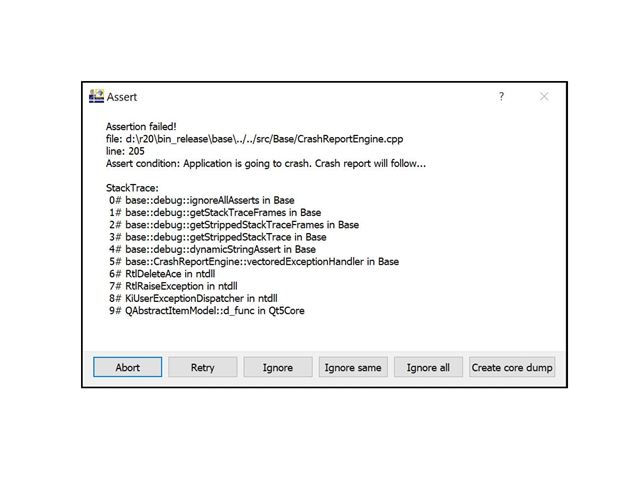
После появления сообщения нажмите «Игнорировать все», и отчет о сбое откроется автоматически.
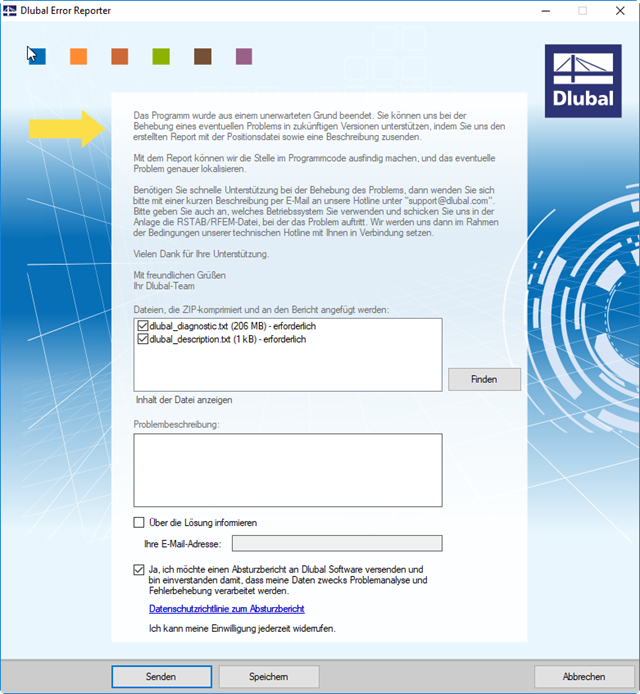
В качестве альтернативы, вы можете попробовать запустить аварийный репортер вручную. Исполняемый файл находится в каталоге программы. В программе RFEM 6.01 путь таков:
C:\Program Files\Dlubal\RFEM 6.01\bin\CrashReporter.exe
Это позволит вам отправить нам хотя бы информацию о вашей системе. Затем мы постараемся найти причину проблемы и исправить ее как можно скорее.
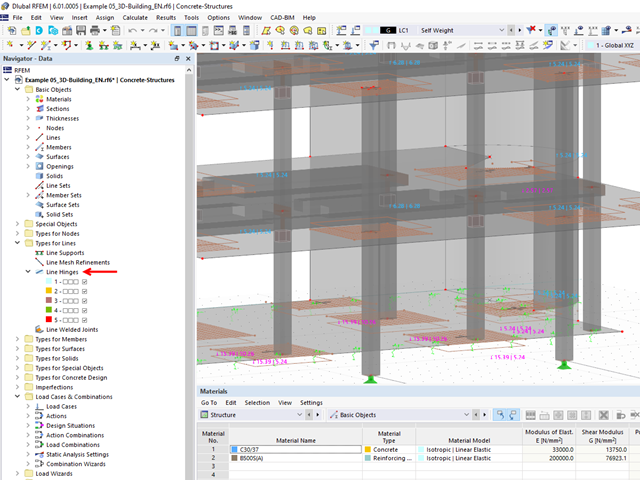
Die Linienfreigaben gibt es in dieser Form in RFEM 6 aktuell noch nicht.
Sie können Nichtlinearitäten in Zukunft aber auch direkt bei den Liniengelenken definieren.Zum aktuellen Stand (November 2021) stehen diese Nichtlinearitäten allerdings leider noch nicht gänzlich zur Verfügung. Diese werden über Programmupdates nachgereicht.
Weitere Freigabetypen für Knoten, Linien und Flächen sind zum aktuellen Stand ebenfalls noch in Entwicklung. Diese werden ebenfalls über Programmupdates nachgereicht.
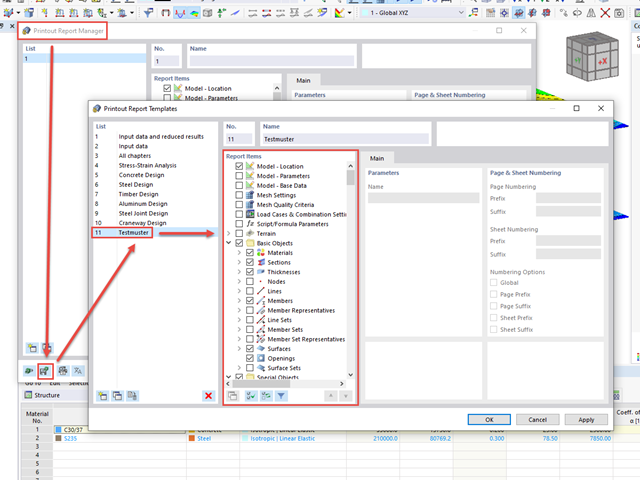
В Диспетчере результатов можно создавать новые шаблоны:
Для этого нажмите кнопку «Сохранить как шаблон» в левом нижнем углу диалогового окна «Диспетчер протокола результатов». Затем появится диалоговое окно «Шаблон протокола результатов», в котором можно изменить элементы протокола результатов для всех шаблонов. Кроме того, можно удалить отдельные пользовательские шаблоны.
Шаблоны протокола результатов сохраняются в файле « report_templatesV2.bin ». Их можно найти в папке данных RFEM или RSTAB, в зависимости от соответствующей версии:
Теперь скопируйте файл и при необходимости замените его на целевом компьютере.
It’s not required to update all RFEM 5 licenses and add-on modules at once. You can begin by upgrading only one RFEM license and add-on modules if you prefer. Over time, you can slowly upgrade your additional licenses.
RFEM 5 is supported in parallel to RFEM 6 and will be maintained with further updates. These updates mainly include the correction of small program bugs as well as adjustments to changes in operating systems and graphics cards in order to maintain functionality. New features and further developments are implemented exclusively in the RFEM 6 software generation.
Support for RFEM 5 continues until further notice as long as there is a valid service contract for RFEM 5. In order to benefit from upgrade conditions, a valid service contract for RFEM 5 is also required.
Purchased RFEM 5 licenses can continue to be used in parallel with RFEM 6 even after a complete upgrade to RFEM 6.
RFEM 5 and RFEM 6 will have separate service contracts with the two levels Basic and Pro available for both generations. You can maintain your RFEM 5 service contract to continue receiving program updates and priority tech support. If you choose to discontinue the RFEM 5 service contract, you can continue using the program but will no longer have access to any program updates.
One significant difference from the RFEM 5 service contract is that when a service contract is purchased for RFEM 6, it will also be required to purchase a service contract for each add-on. The reason for this is you now have access to all national and international standards for a given material (e.g. concrete design acc. to ACI 318, CSA A23.3, EC2, etc. in one add-on). Program updates will include significant updates for the add-ons including the addition of new standards when available.
It’s highly suggested that a service contract is purchased for RFEM 6 as significant development will continue over the next several years for this new generation and will be provided through program updates to those with a valid service contract. Both the Basic and Pro levels will provide access to the latest program updates while the Basic will provide priority email technical support only and the Pro will provide priority email, phone, and screen-sharing technical support.
There are many similarities between the RFEM 5 the RFEM 6 user interface and in general, the modeling workflow including drawing members, surfaces, nodes, etc. will be familiar as well as the program GUI. However, the biggest change will include the concept that design is integrated directly in the main program rather than a separate add-on module dialog box. Design parameters are assigned to members, surfaces, and solids directly when initially modeling the element. The modifications to the modeling workflow will be a more efficient and intuitive approach than previous versions.
Download a free 90-day trial version for RFEM 6 to explore the updated user interface today.
An RFEM 5 model can be opened in RFEM 6 which will transfer most of the geometry, materials, sections, and loading. There may be an exception to some elements for example, material databases which may have been updated or nonlinear support definitions that now have a different definition layout to name a couple. After selecting the file for import, a list of nontransferable elements will be presented before the model is opened in RFEM 6.
Add-on module data will not be available due to the program design changes between generations.
https://download.dlubal.com/?file=RUS.exe
Schritt 1: Senden der c2v-Datei an Dlubal
Schritt 2: Einlesen der v2c-Updatedateien
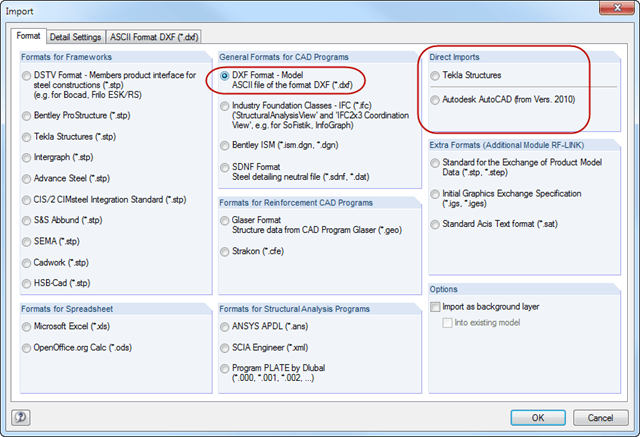
Например, можно импортировать файлы DXF из AutoCAD.
Строки файла DXF также создаются в программе RFEM как линии. Таким образом, можно полностью создать геометрию с помощью импорта. Затем их можно использовать для моделирования в качестве границ поверхностей или осей стержней.
Возможен также прямой импорт. Описания интерфейсов с Tekla Structures и Autodesk AutoCAD Revit доступны в руководствах в разделе Интерфейсы. Eine Liste der Unterstützen Schnittstellen/Programmversionen wird für jede Version in den Updateberichten gelistet. Для этого всегда необходимо проверять отчет об обновлениях первой версии (например, RFEM 5‑20‑ 01 ).
Подробный обзор интерфейсов и BIM-ориентированного планирования доступен на нашем сайте Информационное моделирование строительства (BIM).
Кроме того, уже существует множество вебинаров по BIM, которые вы можете посмотреть на нашем сайте в виде видео.
В связи с обновлением Windows 10 Update 1709 (Fall Creators) могут возникать проблемы с нашим программным обеспечением.
Мы рекомендуем установить Windows 10 Update 1803 или новее, а также программу RFEM версии 5.13 или новее.
In diesem Fall können wir den NET-Softlock manuell aktivieren.
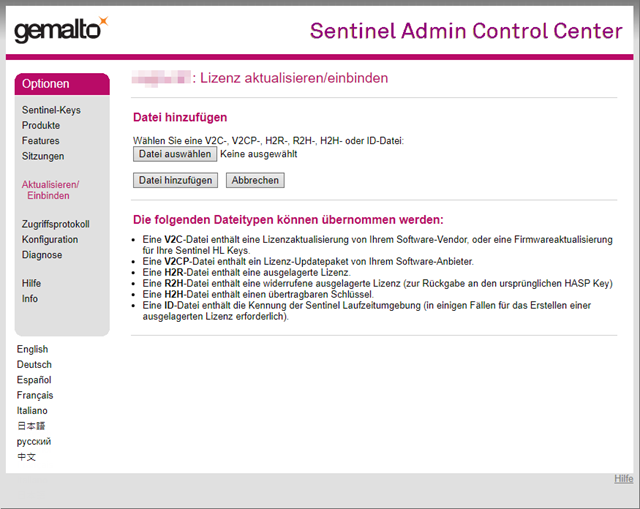
Die Installation der Dongletreiber sollte zuvor durchgeführt werden.Danach öffnen Sie auf dem Server bitte das Admin Control Center in einem Webbrowser Ihrer Wahl.
Gehen Sie dann in die Kategorie Diagnostics. Hier können Sie am rechten oberen Fensterrand über die Schaltfläche "ID" eine Fingerprint Datei erstellen.
Senden Sie diese Datei unter Angabe Ihrer Kundennummer bitte an [email protected].Sie erhalten dann von uns eine "V2C" Datei zurück.
Im Admin Control Center auf dem Server gehen Sie bitte in die Kategorie "Update Attach" und laden die "V2C Datei auf den Server hoch.
Bei einer erfolgreichen Aktivierung erhalten Sie eine entsprechende Meldung.