Поверхности в строительстве могут быть различных размеров и форм, от простых плоскостей, таких как стены, потолки или плиты, до одиночных кривых цилиндров, таких как силосы, до многокривых мембранных структур. Жесткость поверхности определяется ее материалом и толщиной.
Для структурного анализа и генерации сетки конечных элементов на поверхностях создаются 2D элементы, которые применяются по их центральной оси для расчетов. Таким образом можно определить деформации, а также внутренние силы и моменты, которые затем можно проектировать в соответствии с материалом и стандартами.
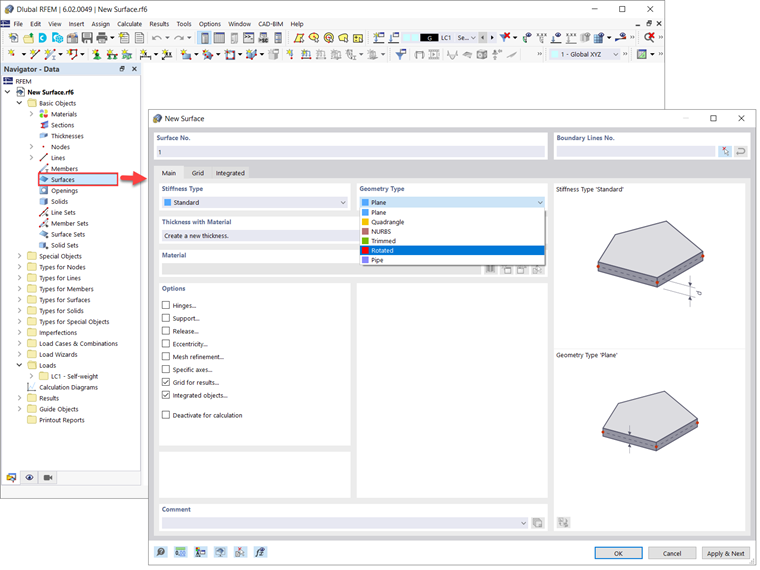
Все вышеперечисленные структуры можно учитывать в RFEM 6, поскольку программа позволяет определять поверхности с различной жесткостью, геометрией, материалами и толщинами. Поверхности доступны как “Базовые объекты” в Навигаторе данных (Изображение 1). Двойной клик по записи открывает новое окно, в котором можно определить интересующую поверхность.
Вкладка “Основное” в окне “Новая поверхность”, показанном на Изображении 1, позволяет определить основные параметры поверхности. Два из этих параметров - это тип поверхности и жесткость поверхности, которые также находятся в центре внимания этой статьи. Таким образом можно определить поверхности различной геометрии:
- Плоские
- Четырехугольные
- NURBS
- Обрезанные
- Вращаемые
- Трубы
Что касается типа жесткости, можно выбрать следующие:
- Стандартный
- Без толщины
- Жесткий
- Мембрана
- Без натяжения мембраны
- Передача нагрузки
Как упоминалось ранее, вы можете использовать эти опции для описания и затем проектирования любой плоской или криволинейной поверхности, которую можно найти в модели здания. Каждый из вышеупомянутых типов будет объяснен в будущих статьях, в то время как этот конкретный текст даст вам более детальное представление о типах поверхностей вращаемых, обрезанных, без толщины и передаче нагрузки в RFEM 6.
Тип поверхности “Вращаемый”
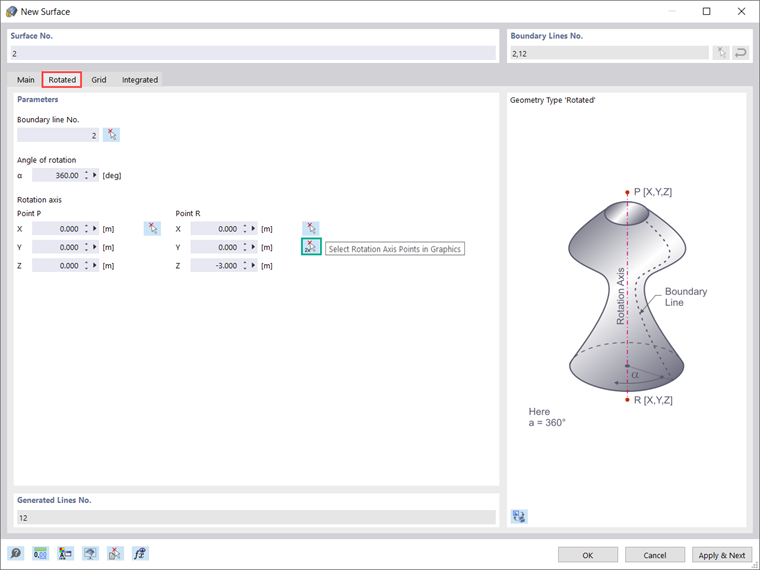
Если вы заинтересованы в моделировании куполов, круглых стен или силосов и резервуаров, это тип поверхности, который вам нужно знать. В общем, вращаемая поверхность создается путем вращения линии вокруг фиксированной оси. При создании вращаемой поверхности в RFEM 6 применяется та же логика: должны быть определены граничная линия, ось вращения и угол вращения. Поэтому, когда вы выбираете тип поверхности “Вращаемый” во вкладке “Основное” в окне “Новая поверхность”, появляется новая вкладка, где вы можете задать эти параметры (Изображение 2).
Как показано на изображении, ось вращения можно определить, выбрав две точки (то есть P и R). Вы можете ввести координаты этих точек непосредственно в окне диалога или выбрать их по отдельности в графике. Также возможен выбор обеих точек одновременно с помощью опции “Выбрать точки оси вращения в графике”.
Если вы уже определили материал, толщину и жесткость поверхности во вкладке “Основное” окна “Новая поверхность”, программа создает поверхность от начальной до конечной позиции линии и по вращению точек определения линии. Как уже упоминалось, это делает создание не только компонентов, но и целых моделей очень простым и быстрым.
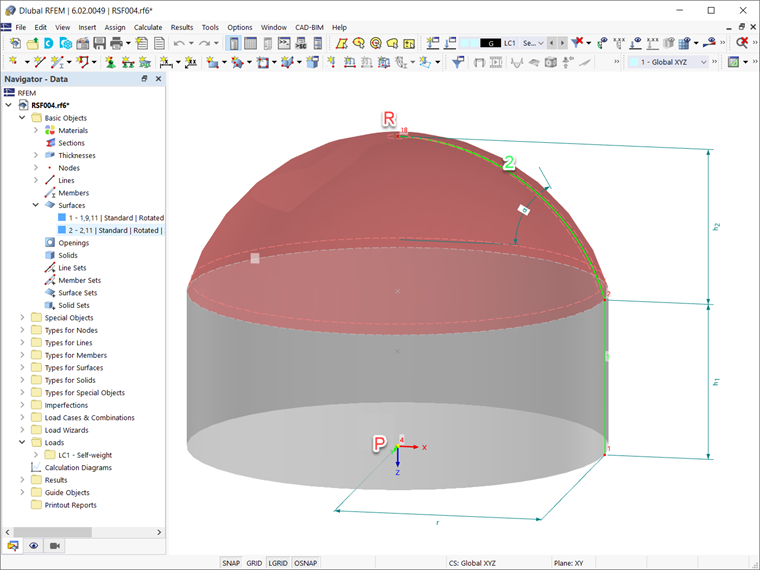
Примером этого является моделирование купола и круглой стены, показанное на Изображении 3. Обе поверхности созданы с помощью типа вращаемой геометрии. Чтобы лучше понять параметры, используемые для создания этого типа поверхности, изображение показывает граничную линию (линия № 2) и ось вращения (представленную узлами P и R) поверхности, представляющей купол. Эта поверхность создается путем вращения граничной линии вокруг оси вращения на угол α=360°.
Тип поверхности “Обрезанный”
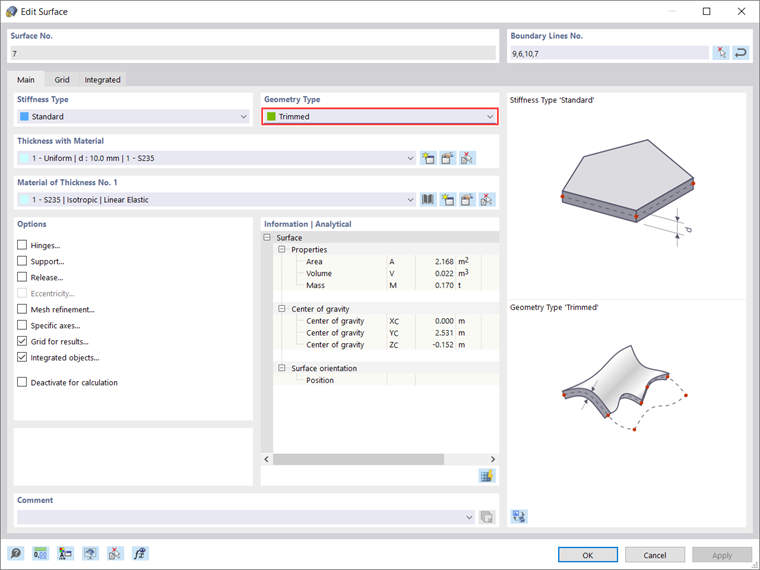
Обрезанная поверхность связана с новой функцией в RFEM 6, которая позволяет пересекать кривые поверхности и тела. При создании пересечения программа генерирует поверхности типа "Обрезанный". Вы можете использовать эту функцию для создания очень сложных геометрий, таких как пересечения труб или криволинейные отверстия, простым и быстрым образом.
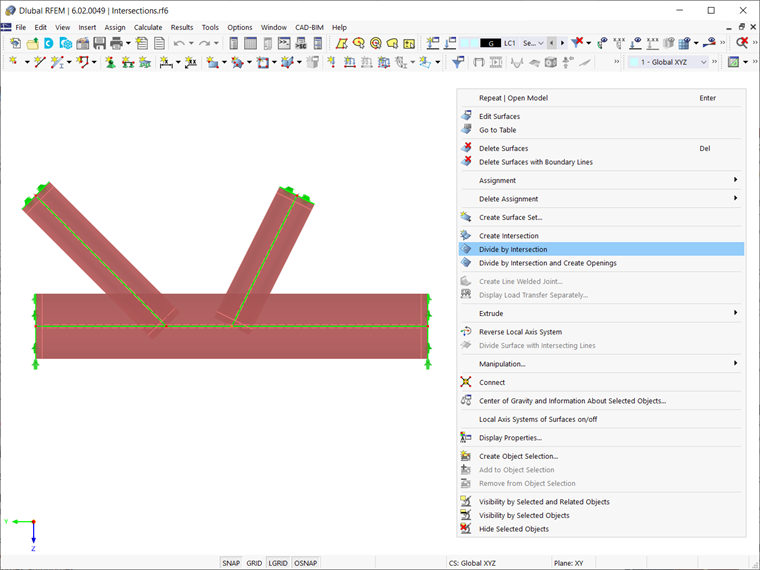
Например, взгляните на модель, показанную на Изображении 5. Есть три трубы, для которых должно быть создано пересечение. Для этого сначала выберите их, как показано на изображении. Затем используйте функцию “Разделить по пересечению”, доступную в контекстном меню выбранных объектов.
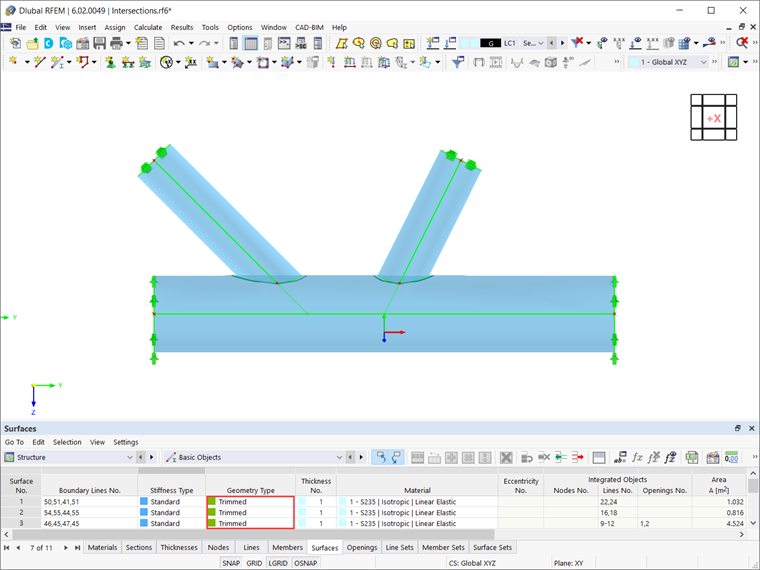
С помощью этой функции начальные поверхности делятся по линиям пересечения, а отверстия автоматически создаются на поверхностях разреза. Это создает новые поверхности, которые могут быть отредактированы или удалены как независимые объекты. Таким образом, вы можете удалить ненужные поверхности и получить пересечение труб, как показано на Изображении 6. Как показано на изображении, поверхности теперь типа "Обрезанный".
Это всего лишь пример использования функции “Разделить по пересечению” и типа поверхности “Обрезанный”. Как упоминалось ранее, вы можете создать много других сложных изогнутых поверхностей или перфорированных тел с помощью этого простого процесса.
Тип поверхности “Без толщины”
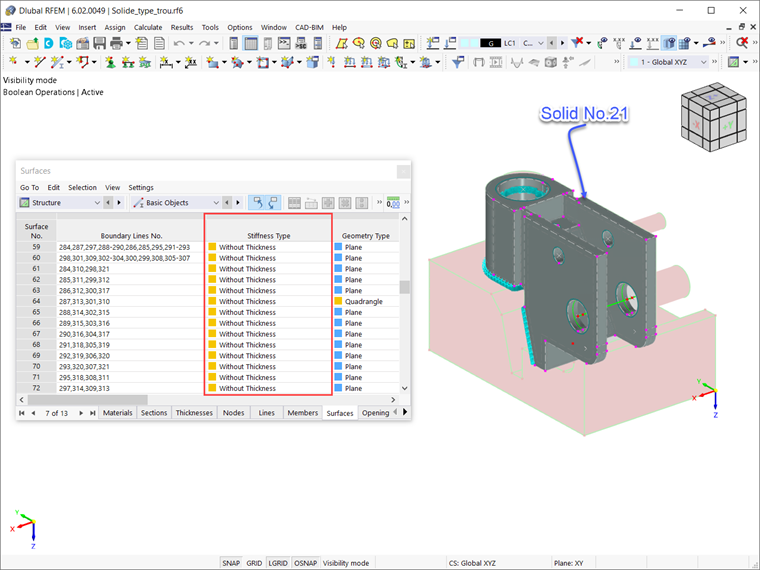
Эти поверхности необходимы для определения тел. Поверхность не имеет жесткости и предназначена для использования в качестве граничной поверхности тела. Однако, поверхности типа жесткости “Без толщины” все же могут быть настроены различными типами геометрии (например, плоская, четырехугольная, обрезанная и т. д.). Пример таких поверхностей показан на Изображении 7.
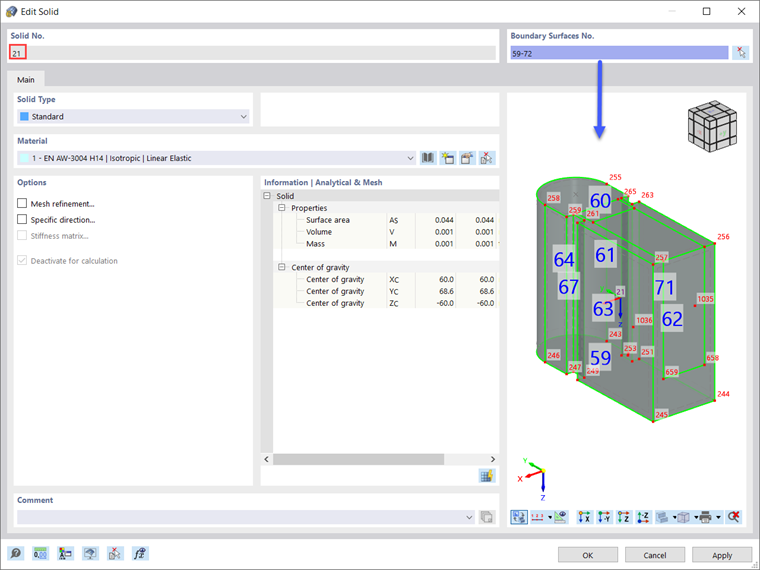
Таблица “Поверхности” на Изображении 7 показывает, что поверхности №№ 59-72 имеют тип жесткости “Без толщины”. Это связано с тем, что они являются граничными поверхностями Тела № 21, как показано на Изображении 8.
Тип поверхности “Передача нагрузки”
В дополнение к мастерам нагрузок, которые упрощают ввод нагрузок, RFEM 6 предлагает новый тип поверхности "Передача нагрузки" для еще более простого применения нагрузки. Таким образом, создавая поверхность этого типа жесткости, программа создает новую поверхность без толщины и структурного эффекта, но с уникальной способностью передавать нагрузки.
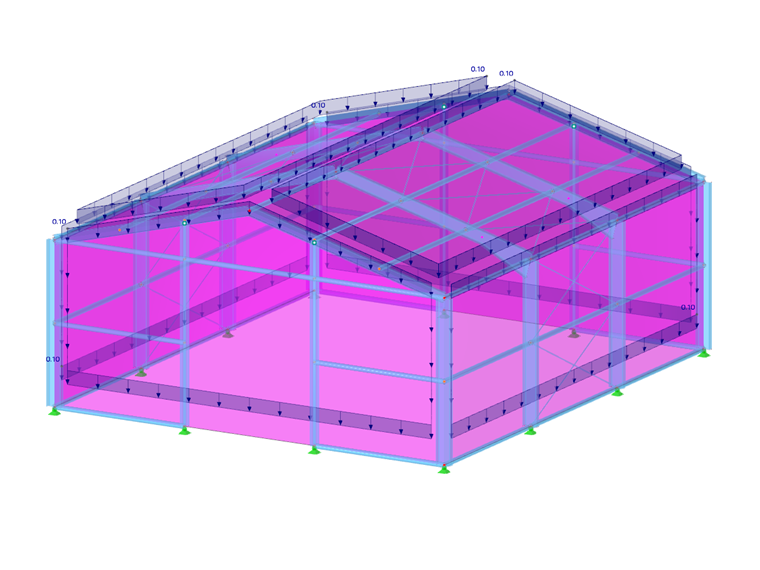
Это выгодная функция в RFEM 6, позволяющая учитывать нагрузки от поверхностей, которые не включены в саму модель (например, фасадные конструкции, стеклянные поверхности, трапециевидные секции крыши и т. д.).
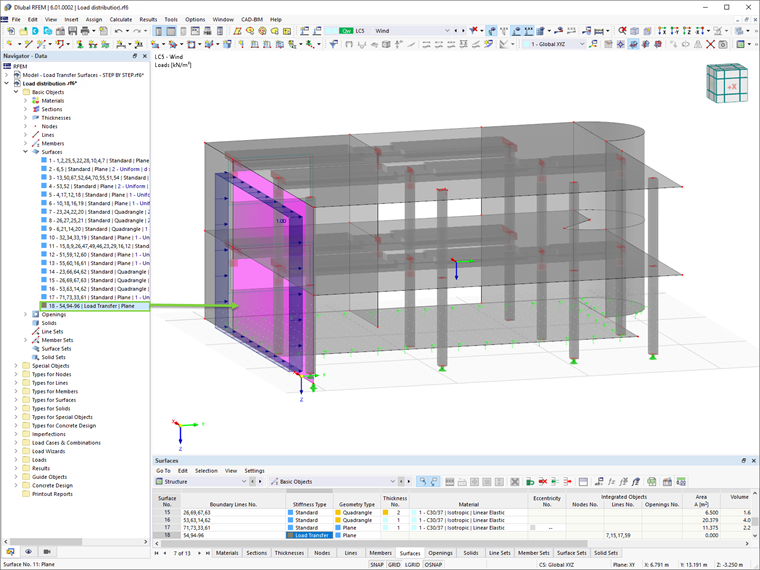
Пример показан на Изображении 9, где поверхность № 18 создана с типом жесткости “Передача нагрузки” для учета ветровых нагрузок на немодельной фасадной стене конструкции.
Как показано на примере, вы можете использовать поверхности передачи нагрузки для применения поверхностных нагрузок к областям, которые не напрямую смоделированы как поверхности. Нагрузка на этой поверхности распределяется на края или интегрированные объекты. Если создаются линейные нагрузки, нагрузка преобразуется в глобальные направления на основе истинной длины линейных элементов (направления нагрузки XL, YL, ZL).
В отличие от мастеров нагрузок, где область нагрузки нужно переопределять каждый раз, поверхность передачи нагрузки может использоваться несколько раз для различных применений нагрузки. Более конкретно, этот подход позволяет назначать различные поверхностные нагрузки, используя одну поверхность передачи нагрузки. Чтобы узнать больше об этом типе поверхности и о том, как задать ее параметры, см. эту статью из Базы знаний: Использование поверхности для передачи нагрузки в программе RFEM 6 .
