Preparation
The following are required for the example and for programming:
- RFEM 6
- EXCEL
- Python
- Dlubal RFEM_Python_Client
- xlwings Python library
- An editor for writing the program
Assuming that RFEM 6, EXCEL, and Python are already installed, the next step is to install the RFEM_Python_Client libraries. We offer various learning videos and help pages describing the installation. The following links are particularly important for installation. They show the installation as well as the first steps in programming:
- Dlubal Dev Docs | Before You Start
- Programming with RFEM 6 and Python | 003 Installation
- Programming with RFEM 6 and Python | 004 Libraries
- Programming with RFEM 6 and Python | 005 Example | Cantilever
Program editors are also discussed in these videos. For the present example, the editor used is irrelevant. Then, you need to install xlwings; the corresponding information can be found on the library website:
The complete code, for example, is located in the RFEM_Python_Client in the following path:
- RFEM_Python_Client/tree/main/Examples/SteelDesign/
The SteelDesignExcel.py file is the Python program (script) and the SteelDesignExcel.xlsm file is the associated EXCEL file.
Example for Programming
The xlwings library offers several options for combining Python and EXCEL. On one hand, it is possible to control EXCEL out of a Python program (better known as a Python script) and to start a Python script out of EXCEL. When starting out of EXCEL, you can either use the built-in plug-in or create a sub-routine, which then starts the Python script. The details are shown here:
In our example, the Python script is started via the built-in plug-in (see the image). There are two requirements. It is necessary to name the Python script exactly the same as the EXCEL file, and to include a main function as this function is then executed via the plug-in.
Here is the first part of the main function:
…
# Open the excel sheet
wb = xw.Book.caller()

# Read inputs
inputSheet = wb.sheets('Inputs')

frame_number = 6
width = 10
frame_length = 4
console_height = 3
column_height = 4
gable_height = 2

# Geometric Inputs
frame_number = int(inputSheet["G6"].value)  # number of frames
width = inputSheet["G7"].value # Width of Frame
frame_length = inputSheet["G8"].value # Frame Length
console_height = inputSheet["G9"].value # Height of Console
column_height = inputSheet["G10"].value # Height of Column
gable_height = inputSheet["G11"].value # Height of Gable
…
If xlwings is used directly out of a Python script (not via EXCEL), you need to open a file first:
wb = xw.Book('userSheet.xlsm')If xlwings is used out of EXCEL, the connection is established using the following command:
wb = xw.Book.caller()The wb variable includes the complete workbook, from which individual worksheets can be extracted using the sheets() method. In the example, the "Inputs" worksheet is opened, and individual cells are accessed by means of square brackets. The value of a cell can be read out or modified by the "value" property. This implementation can be found at the end of the example:
…
# Writing Results to Output Sheets
nodaldeformation["A2"].value = node_number
nodaldeformation["B2"].value = nodeSupportType
nodaldeformation["C2"].value = nodeDisp_abs
nodaldeformation["D2"].value = nodeDisp_x
nodaldeformation["E2"].value = nodeDisp_y
nodaldeformation["F2"].value = nodeDisp_z
nodaldeformation["G2"].value = nodeRotation_x
nodaldeformation["H2"].value = nodeRotation_y
nodaldeformation["I2"].value = nodeRotation_z
…
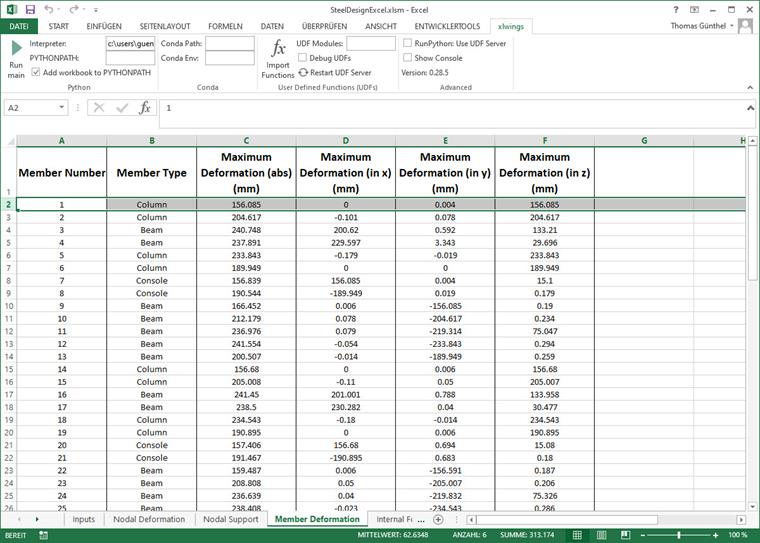
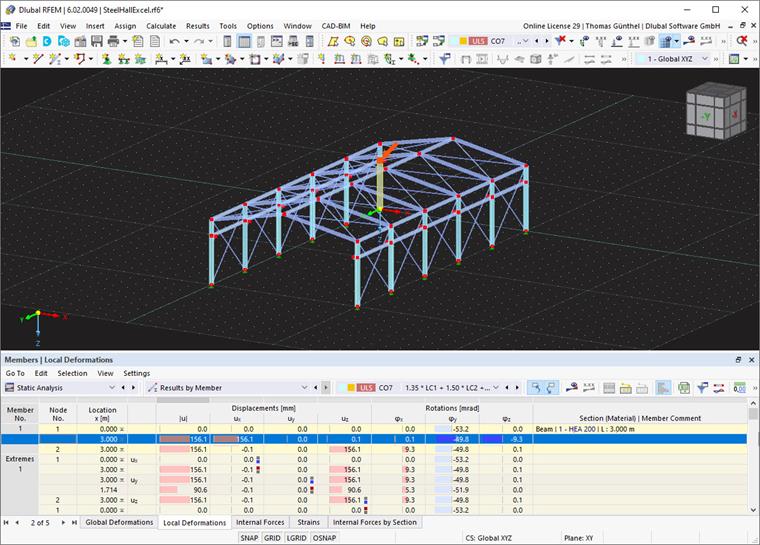
In the present case, Load Combination 7 is read out. Image 1 shows the deformations of the members in EXCEL and, for comparison, the results from RFEM 6 in Image 2.
Conclusion
The example shows that after setting up all necessary elements, it is rather easy to use the API. EXCEL is mainly used as a graphical user interface, and knowledge of Visual Basic for Applications (VBA) is not required. It is also possible that calculations are carried out in EXCEL (also via VBA), and Python only imports or exports data by means of xlwings.


