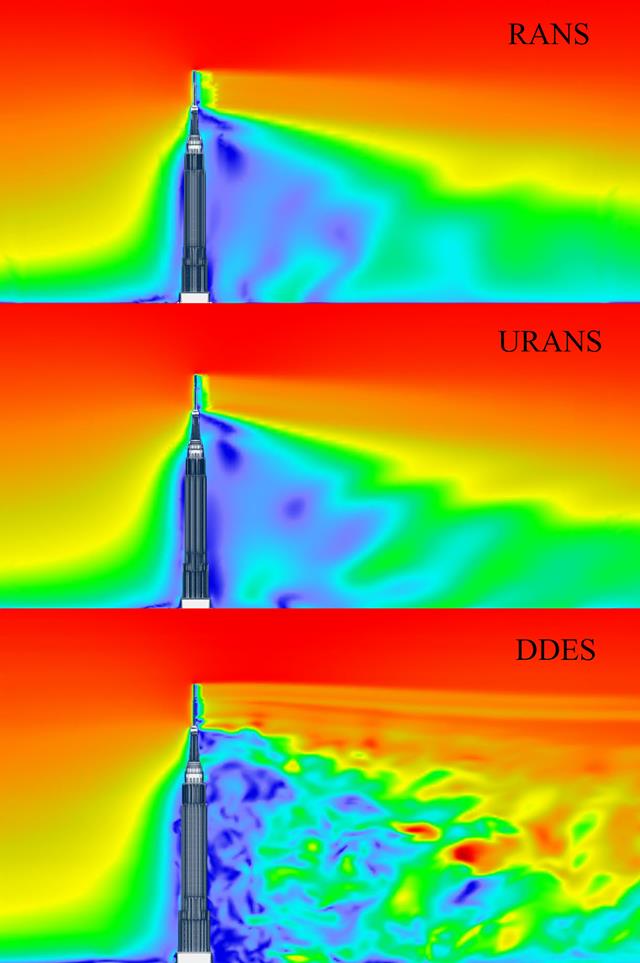
Turbulence modeling is a critical aspect of computational fluid dynamics (CFD) that seeks to predict the behavior of turbulent flows. Turbulence models are essential for designing efficient and safe engineering applications, such as wind-structure interaction in order to structural analysis and design. Among the various approaches to turbulence modeling, three popular models are the Reynolds-Averaged Navier-Stokes (RANS), Unsteady Reynolds-Averaged Navier-Stokes (URANS), and Delayed Detached Eddy Simulation (DDES). Each model has its own unique features and applications.
RANS (Reynolds-Averaged Navier-Stokes)
The RANS approach is one of the most common methods used in turbulence modeling. It involves averaging the Navier-Stokes equations over time, which effectively smooths out the fluctuations of turbulence to provide a steady-state solution. This method simplifies the computational requirements significantly and is particularly useful for applications where the flow is steady or mildly unsteady. RANS models are extensively used in industrial applications due to their robustness and low computational cost. However, they can be less accurate in predicting complex flows with significant separation or strong unsteadiness.
URANS (Unsteady Reynolds-Averaged Navier-Stokes)
URANS extends the RANS approach by allowing for time-dependent changes in the flow field, making it capable of capturing unsteady phenomena. It still utilizes the Reynolds averaging of the Navier-Stokes equations but does not average the flow in time as strictly as RANS. This means URANS can model larger-scale transient flow features and oscillatory behaviors, which are typical in many practical engineering systems, such as vortex shedding from building corners. While URANS improves upon RANS in terms of capturing unsteadiness, it still employs eddy-viscosity models that may not adequately resolve finer turbulent structures.
DDES (Delayed Detached Eddy Simulation)
DDES is a hybrid approach that combines RANS and Large Eddy Simulation (LES) methodologies. In regions of the flow where the boundary layer is attached, DDES behaves like a RANS model, providing computational efficiency. In regions where the flow detaches and larger turbulent structures dominate, DDES switches to an LES mode, which resolves these structures more accurately. This method is particularly useful in complex flows involving flow separation, reattachment, and wake regions, such as building edges and corners. DDES offers a good balance between computational expense and accuracy, particularly in simulating high Reynolds number flows with significant unsteady and separated regions.
Conclusion
Choosing the right turbulence model depends largely on the specific requirements of the problem at hand, including the flow characteristics, accuracy needs, and available computational resources. RANS models are suitable for simpler, steady flows, while URANS provides better handling of unsteady phenomena. DDES, although computationally more demanding than RANS or URANS, offers superior accuracy in cases involving complex, unsteady separated flows. Each of these models has contributed significantly to advancements in fluid dynamics simulations, supporting engineers and researchers in developing more effective and efficient technological solutions.
Show more


