General
Parameter studies are a useful and proven method for fine-tuning simulations. The objectives here can vary: finding an optimal structure with minimal weight to simultaneously ensure safety and conserve resources; adjusting the mesh refinement to obtain reliable simulation results; or varying material properties to test the sensitivity of the simulation and make reliable statements about structural safety. Parameterized modeling provides solutions for these cases and many others. To avoid having to calculate all variants individually, you can use the Dlubal API. This allows you to run the parameter calculation with no need to monitor it.
Parameterized Modeling
Many functions in RFEM 6, RSTAB 9, and RSECTION can already be parameterized. Further information can be found in the respective manuals:
- Online Manuals RFEM 6 | Product Features | Parametric Input
- Online Manuals RSTAB 9 | Product Features | Parametric Input
- Online Manuals RSECTION 1 | Product Features | Parametric Input
Model Access via API
It is necessary to install the corresponding package to access the model via the API. You can also use the console or script manager in the main program directly instead of an external editor. Further information is available at the following links.
Example 1: Wall Thickness Optimization
This model consists of a simple box with a conical cylinder mounted on top. Both parts are made of steel sheet with varying wall thicknesses. They were parameterized to carry out a parametric study. The goal is to find the configuration whose equivalent stress does not exceed the yield stress while minimizing weight. The loads applied include the self-weight and, in a live load case, a concentrated load applied to each component on a rigid surface at the top of the cone. The box has hinged support along two lines on its bottom side. The model and a view of the user interface with the parameterization can be seen below.
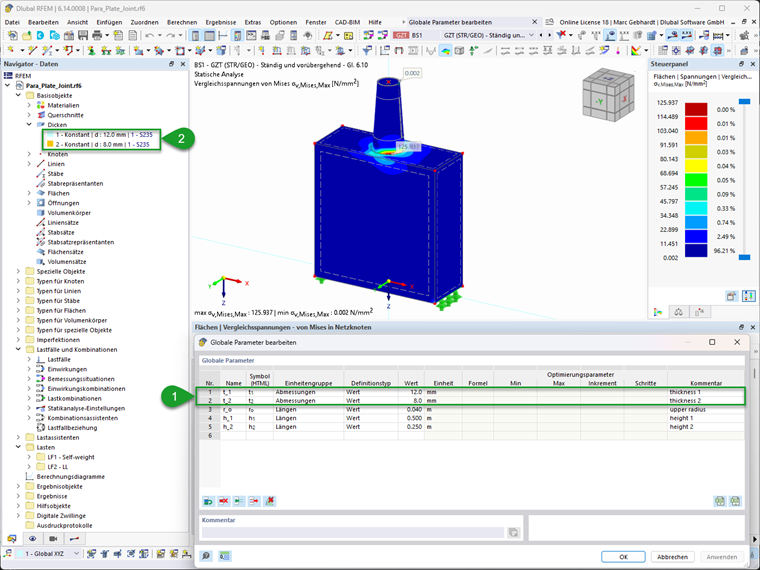
The following script is divided into sections. In the first section, the libraries used are imported, followed by the definition of the variables. Here, the yield stress is specified for visualization purposes, along with the range of the parameters to be varied, which are linked to the plate thickness. Next, functions are defined that will be used later to create the variant matrix and modify the global parameters in RFEM 6.
The main program section begins with the formation of the variant matrix for the global parameters. To do this, all possible variations are generated from the defined parameter variations using the Cartesian product. Subsequently, these are further restricted by the condition that the wall thickness in the lower region must be greater than or equal to that in the structure.
The connection to RFEM 6 is then established via the Dlubal API. In this case, the connection is made to the active model using the API key stored in the configuration file. Both settings can also be specified in the function call.
Now a loop is executed in which the global parameters in RFEM 6 are successively adjusted according to the current mutation, the calculation is performed, and the results are read out. To force a model update and clear the results, the mesh is deleted and regenerated before the calculation. The maximum equivalent stress of all surfaces is determined from the results of the first design situation. The total weight of the structure is determined from the resulting force in the z-direction in the self-weight load case. From this, the weight is calculated by dividing by the gravitational acceleration.
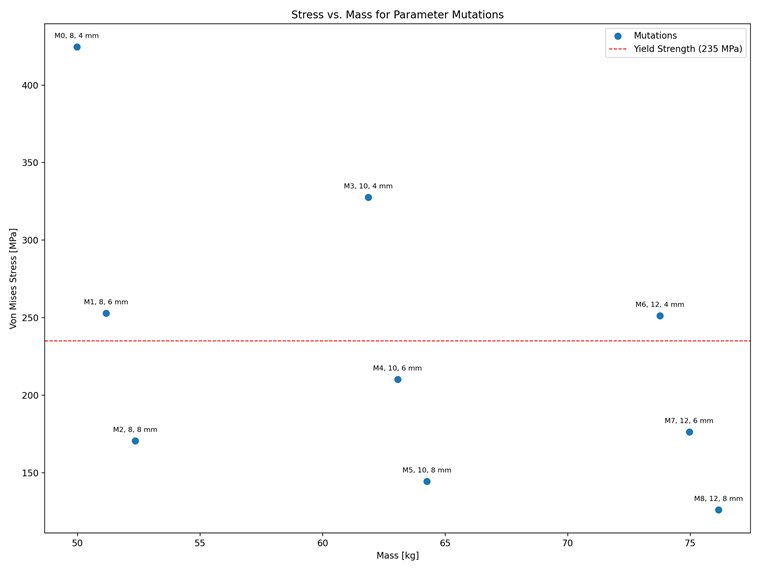
In the last two sections, the results are saved as an Excel spreadsheet and plotted as a graph of stress versus the weight of the structure.
"""ParaS-VMStress_Thick-min.py

Related RFEM 6 model: "Para_Plate_Joint.rf6"
Model: https://www.dlubal.com/en/downloads-and-information/examples-and-tutorials/models-to-download/006159

Run a parameter study via the Dlubal RFEM API, collect result metrics, export and plot results.
and chart.

Sections:
- Imports
- Configuration
- Functions
- Main execution
- Plotting
"""
# --------------------- Imports ---------------------
import itertools
import numpy as np
import pandas as pd
import matplotlib.pyplot as plt
from dlubal.api import rfem


# --------------------- Configuration ---------------------
parameter_ranges = {
    't_1': {'min': 8, 'max': 12, 'step': 2},
    't_2': {'min': 4, 'max': 8, 'step': 2},
} # thicknesses in mm
f_y = 235  # yield strength in MPa

# --------------------- Functions ---------------------
def build_parameter_grid(param_ranges):
    """Build a complete mutation dataset from min/max/step values in mm."""
    columns = []
    value_lists = []
    for name, bounds in param_ranges.items():
        min_val = bounds['min']
        max_val = bounds['max']
        step = bounds['step']
        if step <= 0:
            raise ValueError(f"Step width for '{name}' must be positive.")
        if max_val < min_val:
            raise ValueError(f"Max value for '{name}' must be >= min value.")
        values = np.arange(min_val, max_val + step * 0.5, step)
        columns.append(name)
        value_lists.append(values)
    combinations = list(itertools.product(*value_lists))
    return pd.DataFrame(combinations, columns=columns)

def set_glpa(dl_app, p_name, p_value,):
    """Sets the global parameter p_name to the specified value p_value"""
    params = dl_app.get_object_list([rfem.global_parameters.GlobalParameter()])
    for p in params:
        if p.name == p_name:
            p.value = p_value
            dl_app.update_object(p)
            check=True
            return True
    if not check:
        raise ValueError(f"  Error: Parameter '{p_name}' not found!")

# --------------------- Main execution ---------------------
# Build parameter set
para_dfo = build_parameter_grid(parameter_ranges)
para_dfo = para_dfo[para_dfo['t_1'] >= para_dfo['t_2']]
para_df = para_dfo / 1000  # mm -> m
print(f"Parameter set:\n {para_dfo}")

# Connect to RFEM with current model and run parameter study
with rfem.Application() as rf_app:
    # Check connection and print model info
    app_info = rf_app.get_application_info()
    print("Application Info:", app_info)
    res_paras=pd.DataFrame(columns=['sigvm','sfz'])
    for i in para_df.index:
            # set global parameters
            print(f"Set mutation {i} with parameters {[x for x in para_df.loc[i]]}")
            for p in para_df.columns:
                # print(f"Set mutation {i} with parameter {p} to {para_df.loc[i, p]}")
                if not set_glpa(rf_app, p, para_df.loc[i, p]):
                    break
            # Remesh
            rf_app.delete_mesh()
            rf_app.generate_mesh(skip_warnings=True)
            # Run calculation
            calculation = rf_app.calculate_all(skip_warnings=True)
            # Results
            if calculation.succeeded:
                # Von Mises stresses
                res_sigvm = rf_app.get_results(
                    results_type=rfem.results.STATIC_ANALYSIS_SURFACES_EQUIVALENT_STRESSES_MISES_MESH_NODES,
                    filters=[
                        rfem.results.ResultsFilter(column_id='loading', filter_expression='DS1'),
                        ]
                    ).data
                sigvm = res_sigvm['sigma_eqv_mises'].max()/10**6 # N/m^2 -> MPa
                # self-weight
                sfz = rf_app.get_result_table(
                    table=rfem.results.ResultTable.STATIC_ANALYSIS_SUMMARY_TABLE,
                    loading=rfem.ObjectId(no=1,object_type=rfem.OBJECT_TYPE_LOAD_CASE)
                ).data
                sfz = float(sfz.loc[6].value)  / 10 # N -> kg (g=10 m/s^2 for gravity acceleration)

                res_paras.loc[i] = pd.Series({'sigvm':sigvm,'sfz':sfz})
            else:
                print(f"Calculation failed for mutation {i} with parameters {[x for x in para_df.loc[i]]}")
                res_paras.loc[i] = pd.Series({'sigvm':np.nan,'sfz':np.nan})

# Merge parameters and results for export and plotting
para_out = pd.concat([para_dfo,res_paras], axis=1)

# ---------------------- Export Results ---------------------
para_out.to_excel('./ParaS-VMStress_Thick-min_results.xlsx')

# --------------------- Plotting ---------------------
fig, ax = plt.subplots(figsize=(12, 9))
ax.scatter(para_out['sfz'], para_out['sigvm'], color='tab:blue', s=50, label='Mutations')
y_offset = (para_out['sigvm'].max() - para_out['sigvm'].min()) * 0.03
for x, y, mut, t1, t2 in zip(para_out['sfz'], para_out['sigvm'], para_out.index, para_out['t_1'], para_out['t_2']):
    ax.text(x , y+y_offset, f"M{int(mut)}, {t1:.0f}, {t2:.0f} mm", fontsize=8, va='top', ha='center')
ax.axhline(y=f_y, color='red', linestyle='--', linewidth=1, label=f'Yield Strength ({f_y} MPa)')
ax.set_title('Stress vs. Mass for Parameter Mutations')
ax.set_xlabel('Mass [kg]')
ax.set_ylabel('Von Mises Stress [MPa]')
ax.legend()
fig.tight_layout()
fig.savefig('./ParaS-VMStress_Thick-min_results.png', dpi=200)
plt.show()
As this simple parametric study shows, compared to the initial configuration with wall thicknesses of 12 and 8 mm, using wall thicknesses of 8 mm throughout can result in material savings of approximately 30% without exceeding the allowable yield stress. The results can be seen in the image below.
Example 2: Mesh Convergence Study
This example was previously used in the technical article on mesh convergence studies. It refers to a cylindrical shell for which a linear buckling analysis is performed. The link to the technical article, which contains a more detailed description, and the corresponding model can be found below:
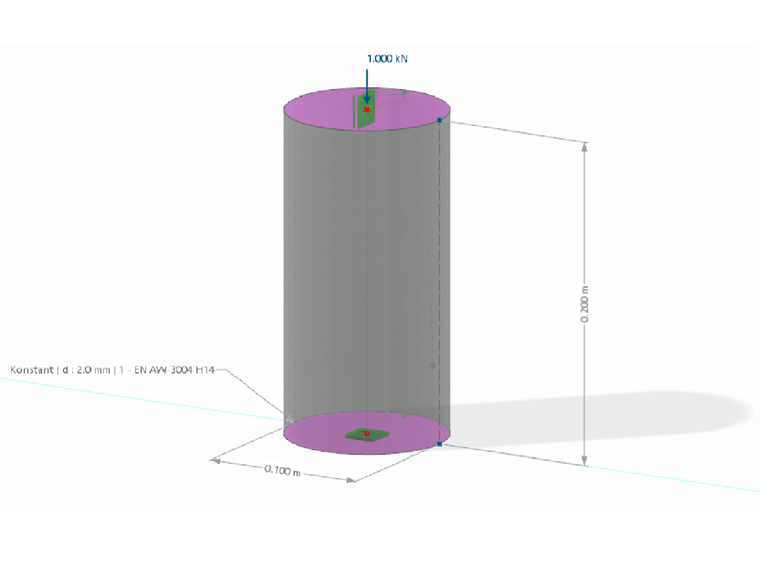
The goal of a mesh convergence study is to adjust the mesh refinement to the point where no significant change in the results occurs, without exceeding a number of elements that would prevent efficient analysis. For this purpose, a global parameter (lfe) was introduced in this model. This parameter was then passed to the surface mesh refinement as the mesh size.
In the following script, the mesh convergence study is performed by gradually changing the target FE mesh size. The basic structure corresponds to that of the first example, so only the differences will be discussed here.
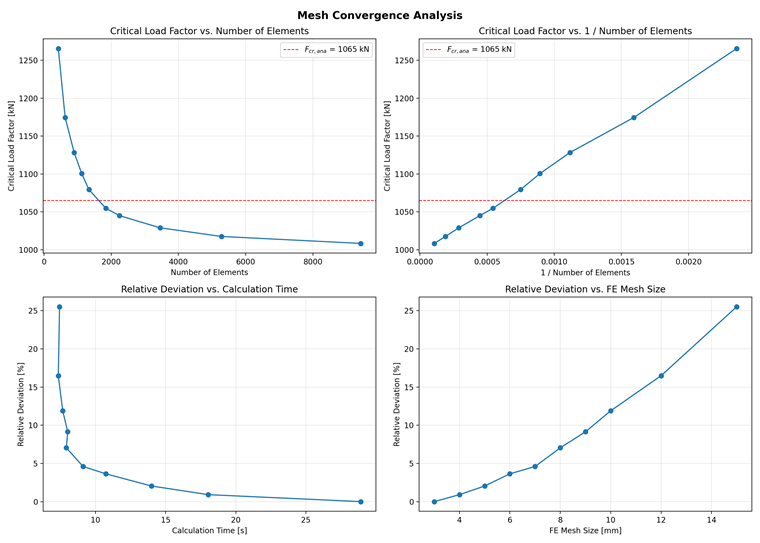
To analyze the influence of mesh refinement on calculation time, this is determined from the process time of the calculation call. The critical load factors are determined from the stability analysis of the first load case. Next, the change in the load factor relative to the previous step is calculated so that the simulation can be terminated if the variation exceeds a certain threshold. Before the results are output, a convergence analysis is performed to evaluate the relative change in the results.
"""ParaS-LBA_MeshConvergence-min.py

Related RFEM 6 model: "MeshSensitivity-LBA_AlC.rf6"
Model: https://www.dlubal.com/en/downloads-and-information/examples-and-tutorials/models-to-download/006080

Run a mesh convergence study in RFEM by sweeping the global parameter
`l_fe`, collect critical load factor, compare variants, save and plot results.

Sections:
- Imports
- Configuration
- Main execution
- Plotting
"""

# --------------------- Imports ---------------------
# Standard library
import time

# Third-party
import numpy as np
import pandas as pd
import matplotlib.pyplot as plt
from dlubal.api import rfem

# ------------------- Configuration -------------------
FE_SIZES_MM = [15, 12, 10, 9, 8, 7, 6, 5, 4, 3] # List of finite element sizes to sweep in millimetres
PARAM_NAME = "l_fe"                             # Name of the global parameter in the model
CONVERGENCE_THRESHOLD_PCT = 1.0                 # Convergence threshold in percentage
FCR_ANA = 1065                                  # Analytical critical load factor (for reference in the plot)

# ------------------- Functions -------------------
def set_glpa(dl_app, p_name, p_value,):
    """Sets the global parameter p_name to the specified value p_value"""
    params = dl_app.get_object_list([rfem.global_parameters.GlobalParameter()])
    for p in params:
        if p.name == p_name:
            p.value = p_value
            dl_app.update_object(p)
            check=True
            return True
    if not check:
        raise ValueError(f"  Error: Parameter '{p_name}' not found!")

# ------------------- Main execution -------------------
with rfem.Application() as rf_app:
    # Check connection and print model info
    app_info = rf_app.get_application_info()
    print("Application Info:", app_info)

    results = pd.DataFrame(columns=['l_fe_mm', 'n_elements', 'c_time_s', 'f_cr', 'delta_pct'])
    f_prev = None
    i = 0
    for l_fe in FE_SIZES_MM:
        i += 1
        l_fe_m = l_fe / 1000.0  # Convert mm to m for use in RFEM
        if not set_glpa(dl_app=rf_app, p_name=PARAM_NAME, p_value=l_fe_m):
            break
        # Remesh
        rf_app.delete_mesh()
        rf_app.generate_mesh(skip_warnings=True)
        n_elem = rf_app.get_mesh_statistics().surface_2D_finite_elements
        # Run calculation
        t0 = time.perf_counter()
        calculation = rf_app.calculate_all(skip_warnings=True)
        t1 = time.perf_counter()
        c_time = t1 - t0
        # Results
        if calculation.succeeded:
            f_cr = rf_app.get_results(
            results_type=rfem.results.STABILITY_ANALYSIS_CRITICAL_LOAD_FACTORS,
            filters=[
            rfem.results.ResultsFilter(column_id='loading', filter_expression='LC1'),
            ]
            ).data.loc[0].f

            if f_prev is not None and f_prev != 0 and f_cr is not None:
                delta_pct = abs(f_cr - f_prev) / abs(f_prev) * 100.0
                delta_str = f"{delta_pct:>4.2f}"
            else:
                delta_pct = None
                delta_str = f"{'---':>4}"

            if f_cr is not None:
                print(f"Mutation {i}: l_fe = {l_fe:.1f} mm | n_elements = {n_elem} | f_cr = {f_cr:.2f} | delta = {delta_str} %")
            results.loc[i] = pd.Series({
                'l_fe_mm': l_fe, 'n_elements': n_elem, 'c_time_s': c_time,
                'f_cr': f_cr, 'delta_pct': delta_pct
                })
            f_prev = f_cr
        else:
            print(f"Calculation failed for mutation {i} with mesh size {l_fe:.1f} mm")
            results.loc[i] = pd.Series({
                'l_fe_mm': l_fe, 'n_elements': n_elem, 'c_time_s': np.nan,
                'f_cr': np.nan, 'delta_pct': np.nan
                })

# Calculate 1 / n_elements for the second plot
results['inv_n_elements'] = 1.0 / results['n_elements']
# Calculate relative deviation from minimum critical load factor
results['rel_dev_f_cr_min'] = (results['f_cr'] - results['f_cr'].min()) / results['f_cr'].min() * 100

# Convergence analysis
print(f"\n  Convergence analysis (threshold: < {CONVERGENCE_THRESHOLD_PCT} % change):")
convergence_point = None
for (l_mm, n, a, d) in results.loc[:, ['l_fe_mm', 'n_elements', 'f_cr', 'delta_pct']].itertuples(index=False):
    if d is not None and d < CONVERGENCE_THRESHOLD_PCT:
        convergence_point = (l_mm, n, a)
        break
if convergence_point:
    print(f"  Convergence reached at l_fe = {convergence_point[0]:.1f} mm")
    print(f"  f_cr = {convergence_point[2]:.2f}  |  n_elements = {convergence_point[1]}")
else:
    print("  Convergence not reached yet – finer mesh required.")

# ---------------------- Export Results ---------------------
results.to_excel('./ParaS-LBA_MeshConvergence-min_results.xlsx')

# ------------------- Plotting -------------------
fig, axes = plt.subplots(2, 2, figsize=(14, 10))

# Plot 1: f_cr vs. n_elements
ax1 = axes[0, 0]
ax1.plot(results['n_elements'], results['f_cr'], 'o-', color='tab:blue', markersize=6)
ax1.axhline(y=FCR_ANA, color='red', linestyle='--', linewidth=1, label=f'$F_{{cr,ana}}$ = {FCR_ANA} kN')
ax1.set_xlabel('Number of Elements')
ax1.set_ylabel('Critical Load Factor [kN]')
ax1.set_title('Critical Load Factor vs. Number of Elements')
ax1.grid(True, alpha=0.3)
ax1.legend()

# Plot 2: f_cr vs. 1/n_elements
ax2 = axes[0, 1]
ax2.plot(results['inv_n_elements'], results['f_cr'], 'o-', color='tab:blue', markersize=6)
ax2.axhline(y=FCR_ANA, color='red', linestyle='--', linewidth=1, label=f'$F_{{cr,ana}}$ = {FCR_ANA} kN')
ax2.set_xlabel('1 / Number of Elements')
ax2.set_ylabel('Critical Load Factor [kN]')
ax2.set_title('Critical Load Factor vs. 1 / Number of Elements')
ax2.grid(True, alpha=0.3)
ax2.legend()

# Plot 3: Relative Deviation vs. Calculation Time
ax3 = axes[1, 0]
ax3.plot(results['c_time_s'], results['rel_dev_f_cr_min'], 'o-', color='tab:blue', markersize=6)
ax3.set_xlabel('Calculation Time [s]')
ax3.set_ylabel('Relative Deviation [%]')
ax3.set_title('Relative Deviation vs. Calculation Time')
ax3.grid(True, alpha=0.3)

# Plot 4: Relative Deviation vs. l_fe_mm
ax4 = axes[1, 1]
ax4.plot(results['l_fe_mm'], results['rel_dev_f_cr_min'], 'o-', color='tab:blue', markersize=6)
ax4.set_xlabel('FE Mesh Size [mm]')
ax4.set_ylabel('Relative Deviation [%]')
ax4.set_title('Relative Deviation vs. FE Mesh Size')
ax4.grid(True, alpha=0.3)

fig.suptitle('Mesh Convergence Analysis', fontsize=14, fontweight='bold')
fig.tight_layout()
fig.savefig('./ParaS-LBA_MeshConvergence-min_results.png', dpi=200)
plt.show()
The following image shows the diagrams generated by the program script, as they are also displayed and analyzed in more detail in the technical article mentioned above.