


General Settings
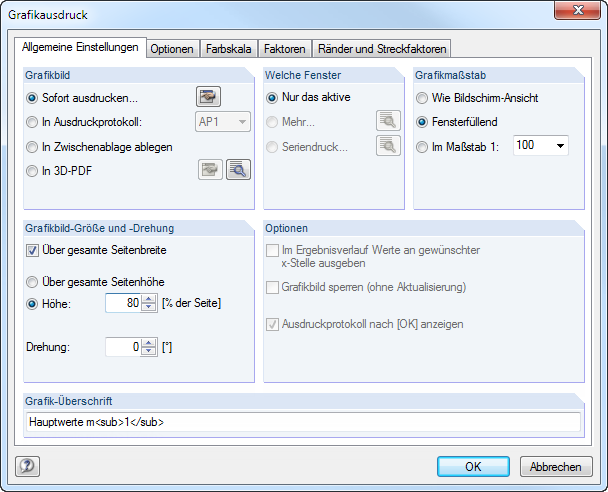
Graphic Picture
There are four options for graphical output: You can send the image
- Print Immediately
- to a printout report (see Chapter 10.1.5)
- to the clipboard
- to a 3D PDF
The Directly to a printer option results in a direct printout. It is possible to adjust the report header by using the [Open Dialog Box] button that opens the Printout Report Header dialog box (see Chapter 10.1.4).
![]()
When printing to a Printout report, the graphic is added to the printout report PR, which can be selected from the list. If no printout report is available, the New Printout Report dialog box is displayed after confirming the dialog box where you can specify the description and content of the printout report (see Figure 10.2).
The Clipboard provides the graphic for other programs. Then you can import the graphic anywhere you want by selecting Edit → Insert in the menu.
If the graphic is to be filed as a 3D PDF, the [Open Dialog Box] button also allows you to adjust the report header.
![]()
The [Details] button opens the 3D PDF Print Page Setup dialog box where the specifications for the print format can be defined.
![]()
You can find further information about 3D PDFs on the Adobe support website.
Window to Print
This dialog section is used for defining the printout settings of multiple window views. Select Current only to print the graphic of the active window (e.g. the right window in Figure 10.46).
Please note that you can only print the graphics of a single model when printing several graphic windows (see Chapter 9.8). A cross-model printout is not possible.

By activating the option to print more windows, the [Details] button becomes available.
Clicking it opens a dialog box with control options for the print arrangement of graphics.

Arrange the windows on the page as they appear on the screen, according to their relative sizes. This usually results in the overall image on the page being wider than it is tall, as on the screen. The Fill page option uses the entire page size for the design ratio to display the windows.
With the Mass print option, you can transfer default graphics to the printout report. After selecting this option and clicking [Details], a new dialog box appears where you can define the parameters (see Chapter 10.2.6).
![]()
Graphic Size
The dialog section in the upper right corner of the Graphic Printout dialog box (Figure 10.45) manages the image scale of the graphic on the sheet.
If you want to use the same scale as displayed on the monitor, select As screen view. This allows you to print zoomed areas or special views.
The Window filling option prints the overall graphic on the sheet. The currently set angle of view is used to display the whole model in the specified graphic image size (see next dialog section).
With the To scale option, the graphic is printed with the scale that is selected in the list or entered manually into the text box. Again, the current angle of view is used. A perspective view is not suitable for the scale printout.
Graphic Picture Size
Settings in this directory section define the size of the graphic on the sheet.
If the Use whole page width check box is selected, the left margin next to the vertical separation line is also used for the graphic, as shown in the figure below.

If you do not want to use the complete size of the graphic in vertical direction, the Height of the graphic area can be defined as a percentage of the page.
The rotation angle in the Rotation text box rotates the graphic for the printout.
Options
This section is described in Chapter 10.1.5. When printing result diagrams, you can use the Show results for selected x-location in result diagram check box to control if values that appear on the position of the vertical line are printed (see Figure 9.20).
Header of Graphic Picture
When you open the Graphic Printout dialog box, a title is preset for the graphic. It can be modified in this text box.